Whoa….BABY!!!

Where to begin…..

First, I want to thank all of those who have viewed, followed, or “liked” my posts! You have all been fantastic in showing your support by helping to boost me to nearly 500 views in less than 2 weeks.

Second, a little history about me. Last year, my husband and I welcomed our first bundle of joy! As some of you may know, he came as quite a shock to us. I was nearly 5 months along before I knew I was pregnant! CRAZY…..I KNOW! Imagine our surprise! Thankfully, our little man is perfect! Given the situation, I had little time to mentally prepare for everything to come, including losing weight post delivery. I wasn’t sure I had the physical or mental capacity to lose the extra weight.

Now onto business….

Other than creating this blog to share my love of cooking, I also wanted to use it as my motivation to have not only myself, but my family eat healthy. It has been just over 14 months since we welcomed our first baby. What an amazing year it has been, but I continued to dread what seemed like an uphill battle to losing the extra baby weight!

I tried so many times in the last year to eat healthy, and tried so hard to motivate myself to exercise a few times a week. I even went as far as to join a local gym that had babysitting. That was a HUGE failure! I quit after the first day when I discovered my nine-month old had pen marks all over his arms!!! So, I was back at square one.

A couple months passed by, and zero motivation. Then one day (July 9th, to be exact), it was like someone lit a fire under me! I had what I considered a “good eating day” the day before, and decided to weigh myself that morning before work. Much to my surprise, I had lost 2 lbs!!!

I began by altering the way I eat, and what I eat. Mind you, I was never a terrible eater, but I didn’t eat great! And I definitely didn’t eat well enough to promote weight loss. I rarely ate breakfast, and ate just OK for lunch and dinner. I always ate a lot of vegetables, but never included much fruit into my daily diet.

Below is a typical day’s food diary:

Breakfast — Fresh fruit with an iced coffee — I have never been a huge fan of coffee, but I really like iced coffee. Thanks to my parents, we have a Keurig machine. I use the vanilla syrup from Starbucks, and add some fat-free half/half.

Lunch — Salad or Sandwich with water or iced tea (sometimes low fat or fat free chips)

Snack — Fresh fruit or vegetables (This is the hardest time of day for me!)

Dinner — Protein (usually chicken or fish for my family) with steamed or roasted vegetables

On occasion I will treat myself to frozen yogurt for dessert.

I have also cut out all soda (with exception to Friday Happy Hour, when we go). I have also cut down on my portion sizes. NO MORE SECOND HELPINGS, except for veggies! I have limited the amount of pasta and potatoes I make (both used to be a big part of our weekly meals). Although, I have kept sweet potatoes.

In terms of activity and exercise, I’m going to be honest. I do not set aside time daily to exercise. I don’t have a gym membership either. However, I have gotten into the habit of taking the stairs at work more often rather than the elevator, and I am also chasing around my son on a daily basis. I try to keep busy as well. I find when I’m not at work, and I’m at home with nothing to do is when my hunger cravings are at their highest!

For some people, losing weight comes naturally. For other people, they need the help of others to lose weight. My husband is not very good at telling me what do, and I’m not very good at taking his advice, but I have to credit my husband for his vast knowledge of fitness and weight loss as well. Hence, why he has made a career of helping people lose weight everyday (www.gxprogram.com). One thing I always hear him say is, “Losing weight is a lifestyle change, it’s not just a diet.”. This is one time I can admit he is….RIGHT!!!

In my opinion, it’s all about finding what works best for you. For me, I needed to wait until I was mentally ready to tackle it. And today, I can say I am officially 10 lbs lighter than I was 3 weeks. I am not on a mission to get in the best shape of my life, but I would like to lose this extra weight before baby #2 comes along (hehe)!!! Ideally, another 10-15 lbs would be great!

Hopefully some of this information can help to motivate or inspire you! This handsome little man is my motivation!! 😀

20120731-163748.jpg

Stay tuned for my progress!

Is it Fall yet??

I have to admit, one of the things I miss most about Pennsylvania (other than my family, of course) is the changing of seasons, especially Fall! The weather is always perfect, and the food is always better! There are so many great flavors and foods associated with Fall, including squash, soup, sweet potato, and my favorite, PUMPKIN!

Let me begin with sweet potato. I did not always like them. I remember as a kid REALLY disliking them. And, man, was I missing out! I could eat them every day now. To be honest, I think what I didn’t like was those candied sweet potatoes always served at Thanksgiving. However, a plan baked sweet potato is delicious, but of course I’m always looking for new ways to prepare them. Below is how I made them tonight to accompany my lemon baked fish (see “Let’s Go Greek” post) and fresh steamed green and wax beans.

Baked Sweet Potato Slices

Ingredients:

2 sweet potatoes
Cooking spray
Salt, to taste

Directions: Preheat oven to 350 degrees. Slice sweet potatoes about a 1/2” thick. Spray foil lined baking sheet with cooking spray. Place sweet potato slices on baking sheet. Spray other side with cooking spray. Sprinkle with salt. Bake at 350 degrees for 30-35 minutes, turning once to evenly cook both sides.

20120729-193340.jpg

Now for the pumpkin!!!

Every Thanksgiving for the past few years, I have been making a pumpkin cheesecake which is absolutely delicious. A couple years ago I came across a pumpkin sausage lasagna recipe (yummy!). And today, on this hot summer day in Florida, I was craving something sweet, but I also wanted it to be relatively healthy. So I took to my pantry to see what I had on hand. I came across a box of angel food cake mix and a can of pumpkin purée. After a search online, I found the recipe below.

Pumpkin Angel Food Cake

Ingredients:

1 box Betty Crocker white angel food cake mix
1 tbsp. Gold Medal all-purpose flour
1 tsp. cinnamon
¼ tsp. ginger
1/8 tsp. nutmeg
1/8 tsp. cloves
1 cup canned pumpkin purée
1 cup cold water

Directions: Preheat oven to 350 degrees. Put all ingredients into a bowl and mix until combined. Pour into a greased 13×9 glass baking dish. Bake at 350 degrees for 25 minutes, or until a toothpick comes clear from center. Let cool before serving. I simply topped it with a spoon of Cool Whip.

20120729-194533.jpg

Recipes inspired by: Edible Perspective

ENJOY!

Cottage Cheese Pasta Bake

20120726-195318.jpg

Let me first say, I do not like cottage cheese! I will ever be a person to just have cottage cheese and fresh fruit. I vividly remember my mom doing this when I was younger, and I could never understand how she thought it tasted good?!?! However, this week I have learned that cottage cheese can be a healthier alternative to help bind or thicken.

I used it to make quinoa veggie burgers earlier this week (which were delicious), and I was racking my brain to try to figure out how I could use up the rest of the cottage cheese. I really did not want it to go to waste. I thought maybe it could be used in place of ricotta cheese. So, I began to do a little investigating on the computer. I came across a recipe that sounded good and easy to make, but I did not have all the ingredients needed.

Below is my take on the original recipe (http://morganmoore.typepad.com) my family was pleased with the result!! My husband even followed the meal up by saying, “Delicious lasagna!!” This made me laugh, and you can clearly tell by his statement why I do all the cooking!!

Cottage Cheese Pasta Bake

2 tbsp olive oil
1 box short cut pasta (like ziti, rotini, etc.)
1 package frozen turkey meatballs
2 onions, chopped
1/2 tbsp garlic, minced
2 jars of Spaghetti Sauce
2 cups cottage cheese
1 cup parmesan cheese, grated
2 eggs
1/4 cup chopped fresh parsley
2 tsp garlic powder
1 tbsp Italian seasoning
1 cup mozzarella cheese, shredded

Directions:
Pre-heat oven to 350 degrees.

Cook pasta according to package directions and set aside.

Bake meatballs according to package directions. Let cool, then dice into bite size pieces. Set aside.

In a medium sauté pan on medium heat, add 2 Tbsp olive oil. Add chopped onion and cook until translucent (about 5 minutes). Add garlic and cook for 1 minute.

Add pasta sauce, diced meatballs, and Italian seasoning. Bring to a boil, then simmer 5 minutes.

In a large bowl, combine cottage cheese, parmesan cheese, egg, parsley & garlic powder. Mix thoroughly. Add pasta to cottage cheese mixture.

Spread 1/3 of meat mixture on the bottom of a greased 13×9 inch glass baking dish.

Spoon pasta mixture into the baking dish and add remaining sauce to the top.

Cover with foil and bake for 30 minutes.

Remove the foil and add the shredded cheese. Cook another 5 minutes uncovered to melt the cheese.

ENJOY!

Almost White Chili…..with homemade tortilla chips!

20120725-190046.jpg

No matter the time of year, my family and I always enjoy a bowl of soup or chili. Something about it is so comforting. For me, when I make homemade soups and chili, it tends to remind me of my childhood. I immediately flashback to the days when my grandmother would make chili, ham bean soup, or chicken corn soup for us. I could never get enough of her soups!

Now with having my own family, I still get that warm and comforting feeling when sitting around the table with a bowl of soup. And , it’s a bonus when little man enjoys the soup too!

Below are the recipes for tonight’s comforting meal:

Almost White Chili

2 boneless, skinless chicken breast
4 cups of water
2 tbsp canola oil
1 medium onion, diced
2 garlic cloves, minced
2 15-ounce cans of white or Great Northern beans, rinsed and drained
1 15-ounce can of black beans, rinsed and drained
3 ears of corn, cut off the cob
1 4-ounce can chopped green chiles
2 tsp ground cumin
1/4 tsp cayenne pepper
salt and pepper to taste

In a medium saucepan, place water and chicken. Bring to a boil, and poach chicken about 10 minutes, or until chicken is cooked through. Remove chicken and put on a plate to cool before chopping/shredding.

Strain poaching water used to cook chicken. Set water aside for use in chili.

In a large saucepan, heat the oil over medium heat. Add the onion and cook until onion is translucent, about 5 minutes. Add garlic and stir about 30 seconds.

Add the beans, corn, chiles, cumin, cayenne, and poaching water.

Bring to a boil. Simmer uncovered for about 30 minutes.

Add the chicken and continue to cook until heated thoroughly.

Add salt and pepper if needed.

Serve with toppings of your choice (shredded cheese, sour cream, cilantro, etc.).

**Recipe adapted from: Flora Dawn

Homemade Corn Tortilla Chips

8-10 small corn tortillas
Cooking spray
Salt, to taste

Preheat oven to 400 degrees.

Cut corn tortillas into mini triangles (I cut the small ones into 8 triangles each).

Coat a baking sheet with cooking spray.

Arrange tortilla slices and spray with cooking spray.

Sprinkle with salt.

Bake at 400º until they start to brown (about 5 minutes).

**Recipe credit: http://couldihavethat.blogspot.com

ENJOY!!

20120725-190105.jpg

Pantry Finds!

20120722-184450.jpg

After spending all afternoon in 90+ degree heat, I honestly had no energy to come home and make an elaborate Sunday dinner. Plus, I never made it to the grocery store this weekend. So, I was forced to make something of what we had.

I always have plenty of chicken drumsticks and chicken breasts in my freezer. They were my starting point. I then went to my pantry to see what I had to dress up the chicken. I came across a packet of buffalo flavored coating mix, and what do I typically like with my buffalo wings? Ranch dressing! I had a partial packet of dry ranch mix as well. And so this is the simple recipe I created below:

Buffalo Ranch Chicken

8 chicken drumsticks
1 packet buffalo coating mix
1 tbsp dry ranch dressing mix

Preheat your oven to 400 degrees.

Combine coating mix and ranch dressing in a plastic bag.

Toss 2 pieces of chicken at a time until all are evenly coated

Place chicken on a greased baking sheet.

Bake at 400 degrees for 45 minutes, or until cooked through. Let the chicken rest about 5 minutes before serving.

This chicken could be served with almost anything. I again resorted to what I had on hand. I chose some pre-sliced carrots that were leftover from a side salad we had earlier in the week. I tossed them in olive oil, and added salt and pepper to taste. Placed carrots on a baking sheet, and baked at 400 degrees for 45 minutes, turning once halfway through. This simple side dish worked out perfect because it was able to cook along with the chicken.

I guess it is possible to make something from nothing!

ENJOY!

Egg-cellent!

You would thinking hard boiling an egg shouldn’t be so difficult, but somehow mine have never turned out quite right! I always like to see a perfect yellow yolk. So with a little bit of trial and error, I think I have finally perfected it! Below is what I have come up with:

Place your eggs in a pot. Fill with water, enough to cover the eggs. Bring water to a boil. Let boil 2-3 minutes. Remove from heat, and cover for 15 minutes. Place eggs immediately in ice water to shock them. This will stop the eggs from cooking any further. Once peeled, and cut, you should have hard boiled eggs with perfect yellow yolks.

Today I used my hard boiled eggs to make some egg salad for lunch. This recipe I learned from my parents growing up. Following is the recipe:

2 hard boiled eggs, peeled and chopped
1 tbsp light mayonnaise
1 tsp light miracle whip
1 tsp yellow mustard
Salt and pepper, to taste

Combine all ingredients in a bowl. Stir until well mixed. Chill in refrigerator for at least 30 minutes before serving.

I typically like to have mine on bread, but the egg salad is also delicious by itself or on crackers.

ENJOY!

20120721-133444.jpg

Journey Of A Spaghetti Squash

I first discovered spaghetti squash a few years ago, and fell in love with it! It can be used to substitute pasta or it can be made into a side dish to accompany your main course of chicken or fish.

Typically, I had steamed the squash in the microwave until tender, usually about 12 minutes, would cut and scrape the inside. I then added a little butter, salt, pepper, and grated parmesan. It was delicious every time!

Then, as time passed, I began searching for other ways to make this yummy vegetable. I came across a site online that recommended cutting the squash in half, drizzle with olive oil, and sprinkle with salt and pepper before roasting it in the oven. Also, very delicious.

As a person that thrives on finding new recipes and ways to cook things, I began searching for yet another way to reinvent spaghetti squash. So I then prepared it in the manner I used for this recipe. Also roasted, but using chicken stock to help steam it rather than oil.

But, you know, I couldn’t just leave it at that. So below is the recipe for a delicious Spaghetti Squash Bake (I apologize for the picture of the half eaten dish….I couldn’t wait to try it, and forgot all about taking a picture until my family was finished with dinner :))

Spaghetti Squash Bake

1 medium spaghetti squash
Chicken stock, reduced sodium
2 tablespoons butter or margarine
1 small yellow onion, cut in half and very thinly sliced
1/4 teaspoon red pepper flakes, or more if you like it spicy
1/4 tsp dried thyme
1/2 cup fat free sour cream
1/2 cup reduced fat shredded cheddar cheese

Preheat oven to 400 degrees.

Cut the spaghetti squash in half and remove the seeds. Place face down in a glass baking dish with a 1/2 inch of chicken stock.

Bake squash for 1 hour or until tender and easily pulls from skin with a fork.

Remove from oven and let cool enough to handle.

Lower oven temperature to 375 degrees.

In a medium sized skillet over medium heat, add the butter, onions, red pepper and thyme and cook until the onions are slightly brown in color. Salt and pepper to taste.

Using a fork, scrape the insides of the squash and transfer to a small bowl. Combine the squash, onions, sour cream and half the cheese together and mix well. Transfer the mixture to a greased baking dish and top with remaining cheese.

Place into a 375º for 15 – 20 minutes until golden brown on top.

**Recipe developed from Dandy Dishes

After tasting, the only part I would alter from my interpretation of this recipe is to add a little more heat, possibly up to 1/2 teaspoon red pepper flakes or a jalapeño.

Have fun, and make it to suit your family! ENJOY!

20120719-190127.jpg

Let’s go Greek(ish)!

20120718-185212.jpg

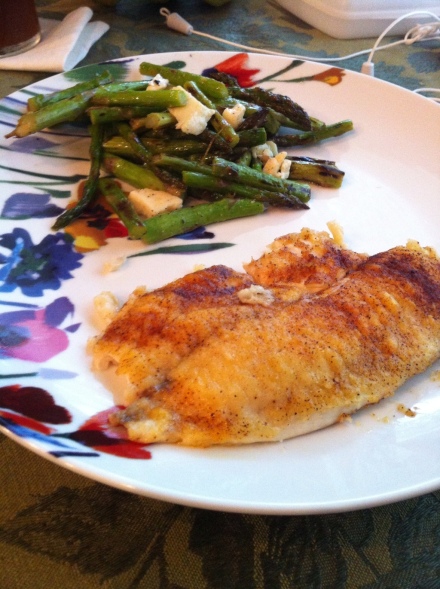
Well, let me first start off by saying, I’m not quite sure if I should be proud or slightly embarrassed that my 14 month old son just ate the entire plate (pictured above)?!?! I have never seen a little guy eat as much as he does on a daily basis. Maybe it’s a sign of how good of a cook I am?? Lol…just a little pat on my back!

Anyway, this lemon baked fish I had made last week using cod fillets instead of the tilapia I used tonight. Last week was the first time I had made fish in a LONG time. Partly because those comments you always here about how easy it can be to mess up or over cook fish always held strong in my mind, but it was time to step out of my comfort zone. It was absolutely delicious with cod, and equally as delicious with the tilapia. A slightly different flavor though. I think the tilapia absorbed the lemon butter much more than the cod. The lemon feta asparagus was a wonderful compliment to the fish.

Below are the delicious recipes from tonight’s yummy dinner….ENJOY! 🙂

Lemon Baked Tilapia —

Ingredients:

1 lb tilapia fish fillets
1/4 cup butter or 1/4 cup margarine, melted
2 tablespoons lemon juice
1/4 cup all-purpose flour
1/2 teaspoon salt
1/8 teaspoon white pepper
paprika

Directions:

If fish fillets are large, cut into serving pieces.

Mix butter and lemon juice.

In another bowl, mix flour, salt and white pepper.

Dip fish into butter mixture; coat fish with flour mixture.

Place fish in ungreased square baking dish, 8x8x2 inches.

Pour remaining butter mixture over fish; sprinkle with paprika.

Cook uncovered in 350 degree oven until fish flakes easily with fork, 25-30 minutes.

Garnish with parsley sprigs and lemon slices if desired.

**Recipe thanks to: http://www.food.com

Grilled Asparagus & Feta Salad —

Ingredients:

1 bunch thick asparagus, about 24 spears, ends trimmed
3 tablespoons extra virgin olive oil, divided
1/4 teaspoon kosher salt
1/4 teaspoon freshly ground black pepper
1 teaspoon lemon zest, from one lemon
1 tablespoon freshly squeezed lemon juice, from one lemon
1/3 cup crumbled feta cheese

Directions:

Preheat grill to high.

Place asparagus spears in baking dish and toss with 2 tablespoons olive oil, salt and pepper.

Put asparagus on the grill, making sure spears are perpendicular to grates so they don’t fall through. Set asparagus dish next to grill (do not clean).

Cover and cook asparagus for 3-4 minutes, until nicely browned and tender-crisp.

Remove asparagus from grill and place back in baking dish.

Let cool, then transfer spears to cutting board and cut into 1½” pieces.

Place cut asparagus back in dish, then add remaining tablespoon olive oil, feta, lemon zest and lemon juice.

Toss gently and season with more salt, pepper and lemon juice to taste. Serve room temperature or cold.

**Recipe courtesy of: Once Upon A Chef

Asian Inspired Dinner!

20120717-184558.jpg

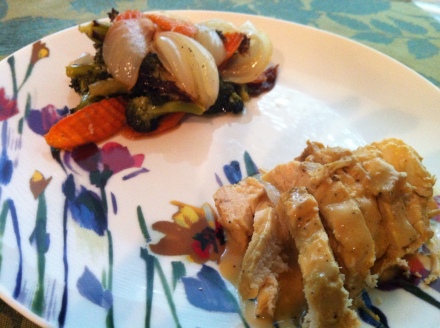
I am always trying to find new ways to curve my husband’s Chinese takeout obsession. No joke, he would eat it every day if I let him! So, the meal pictured above was my attempt at some Asian cuisine. I’m happy to say he definitely enjoyed this meal, and so did my 14 month old son. Another weeknight meal success!!!

Below are the ingredients and recipes used for this dinner.

Maple Dijon Baked Chicken —

4 chicken breasts, boneless, skinless
Dijon mustard- 1/2 cup
Maple syrup- 1/4 cup
Rice wine vinegar- 1 tablespoon
Fresh rosemary, chopped

Directions:

Preheat your oven to 400 degrees.

Then, mix together 1/2 cup of dijon mustard, 1/4 cup of maple syrup, and 1 tablespoon of rice wine vinegar.

Put boneless, skinless chicken breasts into a foil-lined, oven-proof baking dish.

Then, salt and pepper the chicken.

Pour your maple mustard mixture over them, turning the chicken in the mixture so it is fully coated.

Put the chicken into the oven, and let them bake for30-35 minutes or until a meat thermometer reads 165ºF. Baste the tops of the chicken with more sauce half way through.

Place the chicken on a plate to rest. Keep warm.

Pour the basting sauce into a small sauce pot. Bring to a boil. Reduce heat and simmer 6-8 minutes until slightly thickened.

Plate the chicken, making sure to spoon some extra sauce over the top.

Sprinkle over some fresh rosemary (Which I accidentally omitted, but it was still so delicious!).

**Recipe inspiration http://www.wittyinthecity.com

Roasted Asian Veggies w/Sesame Dressing —

Vegetables (broccoli, carrots, onion, etc.)
2-3 tbsp. Olive oil ( just enough to coat veggies for roasting)
Salt and pepper, to taste

Sesame Dressing:
2/3 cup rice vinegar
1 cup canola oil
2 Tbsp sesame oil
4 cloves garlic, pressed or very finely minced
2 Tbsp soy sauce
1/2 cup sugar
4 Tbsp sesame seeds

Pour all ingredients into a mason jar/container and shake/stir vigorously. For optimal flavor, make ahead of time and store in the fridge. Shake/stir to blend before each use.

Preheat oven to 400 degrees

Once you have chosen your favorite veggies, cut them all to about the same size so they cook evenly.

Coat vegetables in olive oil, salt, pepper. Place on foil lined baking sheet.

Roast at 400 degrees for 40-45 minutes, or until veggies are tender.

Immediately upon removal from oven, toss veggies with enough dressing to coat.

**Sesame dressing recipe compliments of http://penniesonaplatter.com

ENJOY!

Double Rainbow!

20120717-175251.jpg

Although this picture has nothing to do with cooking or food, I felt compelled to post it! When I first saw this double rainbow on my drive to work, I thought it must be the sign of a good day ahead. But the more I thought about it, I think it was simply a sign of everything and everyone wonderful in my life right now. Seeing this rainbow, I found myself taking a minute to stop and appreciate life!